We’ve talked about how to find cracks in cylinder heads and blocks using magnetic particle inspection, dye penetrant inspection, vacuum testing and pressure testing. Now it’s time to discuss repairing the cracks you’ve found.
Let’s start by saying that not every crack you find needs to be repaired. If the crack isn’t located in an oil passage, bolt hole or other seal surface you don’t need to fix it completely. You do, however, need to stop the crack from growing. If you don’t, odds are you’ll be fixing it in the future. To stop the crack from growing you need to do what’s called “stop drilling”. This means you drill a tiny hole – about 1/8” diameter – just past the ends of the crack. This hole will relieve the stresses placed on the metal and keep the crack from expanding.
As with most operations in the machine shop, there are multiple methods you can use. Some methods work better on certain materials (cast iron v. aluminum, for example) and some are just pure personal preference. The most common methods for crack repair used in automotive shops are:
- Tapping & Plugging
- Welding
- Sealants
- Inserting Sleeves
The focus of this post will be Crack Repair Plugs. We’ll talk about Welding, Sealants and Sleeves in the future.
Tapping & Plugging – the tried and true method of Crack Repair
The most common system available for tapping and plugging cracks is Irontite. As the name implies, this method of crack repair requires taps and plugs. You will also need correctly sized drills and tapered reamers. A special thanks to Irontite for providing the working photos in this post.
Method 1
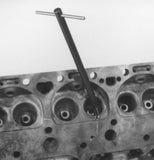
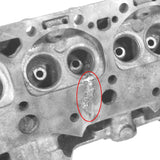
The first type of application we’ll talk about is installing tapered plugs to repair a crack in the area of a casting that is subject to high pressure and/or temperatures. A perfect example of this is a crack in the valve seat area of the head. To repair this type of crack you’ll install the plugs at an angle to the casting surface, not perpendicular. You will also be overlapping the plugs.
-
Drill a plug hole at least 1/8” past the visible ends of the crack. This is to stop the crack from growing as you put pressure on the casting by installing plugs. Be sure to use compressed air to clean out the holes, every step of the way.
- After drilling, use a tapered reamer in the hole to make tapping easier and reduce tap breakage. This is particularly important where the material you’re drilling through is thick.
- Next tap the hole at one end of the crack. Be careful not to tap too deeply. You may run into another wall within the casting or the plug might seat too deeply before it is tight. One rule of thumb is to count the number of threads in the hole and tap so that the plug goes in the same number turns. For example, you have six threads so you turn the plug six times.
-
Dip the end of the threaded plug with sealer such as Ceramic Motor Seal (CRS-16) or Fluid Weld (FW-2) and tighten it into the tapped hole.
- Saw off the excess plug material. For best results, be sure to cut at least half-way through the plug before snapping off the remaining material. This should keep the plugs from snapping off below the surface.
- Peen the surface of the plug and the surrounding area.
- Be sure to locate the next plug so that it overlaps the one you just installed. You will continue in this fashion until the entire crack has been repaired.
The peening process is extremely important. It helps close the threads at the surface of the casting. When peening, always peen away from the center of the plug. In the peening process, the position control of the air hammer is most important. It provides the necessary control over the direction of the ends of the peening tools.
Method 2
A similar, but slightly different application is used when repairing cracks in easily accessible areas of the casting that aren’t subject to high pressure or temperature and the metal is relatively thin.
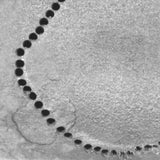
After the crack is outlined, drill and tap holes along the line of the crack about 1/4” to 1/2” apart. NOTE: Where the material is less than 1/4” thick, it is not necessary to ream before tapping.
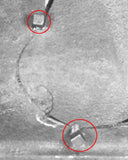
- Capture the crack at each end.
-
Torque the plugs in concurrently so that none of them will be loosened as other plugs are torqued in. Be sure to dip each of the plugs into sealer such as Ceramic Motor Seal (CRS-16) or Fluid Weld (FW-2).
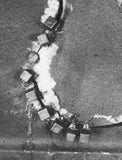
- Cut the plugs off about 1/16” above the surface and peen them. Always peen from the center of the plug toward the thread in the plug.
- Peen the crack itself, peening inwardly toward the center of the crack.
You can also drill and tap the holes in a lacing fashion on opposite sides of the crack. You’ll torque the plugs in at the same time and then cut them off. Peen the plugs and the crack in the same manner as above. This process, in addition to closing the crack with additional metal and with peening the crack, develops a resistant elasticity in the metal which helps keep the crack closed.
THE IMPORTANCE OF PEENING IN CRACK REPAIR CANNOT BE OVEREMPHASIZED.
Some final tips, tricks and cautions.
Even when the hole is reamed with a tapered reamer be sure to use the proper amount of downward pressure with the tapered tap. You’ll also want to use a good tapping fluid.
A note from Irontite: “Irontite tapered plugs and tapered taps are designed so there will be a tight thread-to-thread fit when the plugs are torqued into position. When torquing in the plug, as an added assurance of a leak-proof fit, dip the plug in Irontite’s Ceramic Seal or Fluid Weld just before torquing it in. This will help close any porosity that may be present in the threaded hole of the casting. Ceramic Seal is recommended because, being fluid it will spread evenly on the threaded plug as it is torqued in.”
A couple of other tips that you need to know include using the same material for the plugs as the head is made of. For example, if you’re repairing a cast iron head, you’ll use iron plugs. You’ll also need to be sure that you have actually repaired the entire crack by pressure or vacuum testing.
As we said earlier, this is just one of the methods you can use to repair cracks in your cylinder heads and blocks. We’ll discuss the other methods in future posts. Be sure to check back often.
As always, if you have any additional questions about crack repair, be sure to contact the Goodson Tech Department at 1-800-533-8010 or email.
* This post is provided as an information resource only. This document should not be taken as a warranty for which Goodson or its vendors assume legal responsibility.