By Jim Tapp, Manager, Tech Services Department, retired
Let’s talk seats. Valve seats. A while back, we touched on valve seats and now we’re back for more. As I said, there’s a lot to talk about when it comes to valve seats, so I’ll try not to rattle on too long.
By way of introduction, let me say that this is going to be an “entry level” summary of valve seat work.
I’ll assume that if you’re reading this, you know what a valve seat is and have at least a passing knowledge of why you grind or cut seats but just so we’re all on the same page, here’s the definition I’m working from:
The object of grinding or cutting is to obtain a valve seat of a specified, uniform width in the correct position on the valve face with minimal stock removal.
While we’re talking definitions, let’s get a few more out of the way:

Top Angle: usually 30°, this is the angle on the combustion side of the seat angle
Seat (Main) Angle: usually 45°, this is the angle at which the seat and the valve face mate to produce a gas-tight seal
Throat Angle: generally 60°, this is the bottom angle which transitions airflow from the seat angle to the port.
A couple of cautions right up front. Before you begin to work on your valve seats, you must have your valve guides in good condition. Remember, your pilot centers in the guide and if that’s off, the seat will be off too. You also need to have seats that are in good condition before you try grinding or cutting them. If the seat insert is cracked or loose, correct this problem first. For a quick refresher on removing and replacing seat inserts, take a look at “Use your 3-D Fast Cut™ system to remove valve seat inserts without damaging the counterbore.”
Now, assuming you’ve got a solid valve seat insert, let’s look at why you’d want to grind or cut that seat. Of course the main reason is that you have uneven wear on the seat and your valve face isn’t sealing properly. Without a good seal, you’ll have uneven valve cooling and compression leakage resulting in poor performance, among other things.
The other reason you’d want to modify your valve seat is to improve airflow. Remember, every time the flow of air is changed, you lose the ability to create power. With that in mind, you want to transition between seat angles as seamlessly as possible. This is why you’ll see multi-angle seat cutters and seat grinding stones with different angles.
In addition to airflow, you need to be concerned with the seat width. You want the seat to be wide enough to cool the valve, but narrow enough to resist carbon build-up. Yes, narrower seats have better airflow, but there’s a trade-off. Narrow seats are less durable so you’ll be working on them more often, which leads to another problem. The more you cut away at the 45° angle, the wider it will become and the lower your valve will seat which opens another whole can of worms.
I know, with all of the angles and widths and valve heights and so on, it sounds like a geometry lesson. Well, I hate to break it to you, but IT IS. There are tools out there that take some of the math out of the equation, but you still need to be able to measure angles, figure widths, and more. A good resource is the Racer’s Math Handbook by Bob Emmons.
Okay, now that we know why we cut and grinding valve seats, it’s time to decide what method to use. Machining valve seats started out as a grinding process and has evolved to cutting but both methods are still widely used and work equally well. That said, there are advantages and disadvantages to both. Since grinding was the first method used, we’ll start there.
Grinding is a machining method for the “everyman” out there. There’s some investment in tooling, but not a tremendous amount. Once you have your stone holder and driver, you can work on a variety of seats just by changing the size and angle of your grinding wheels. There are several formulas of abrasives available these days to give you the finish that you’re looking for. Another advantage is that you can customize the seat stones with a dressing stand. If you need a 39° angle, you can make it yourself quickly and easily.
BUT, grinding can be time consuming. Each angle is ground by a different stone and there’s always chance for operator error. If the stone isn’t aligned just right in relation to the seat, you’ll end up with an unusable seat and you’ll have to start over. Abrasives also wear and need to be dressed and/or replaced regularly.
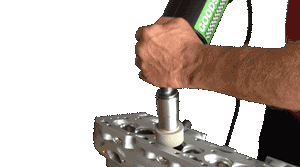
The next evolution of valve seat machining is hand-cutting using a valve seat cutting system such as the one from Neway. These cutters feature replaceable tungsten carbide cutters mounted in cutter bodies at specific angles. Using multiple cutters allows you to achieve multiple angles on a single seat. These are great “entry level” seat cutters because they are turned by hand (no expensive machines or drivers required) and produce an excellent finish. The disadvantages are that, like grinding, you need to use multiple cutters to complete a valve seat and you can inadvertently put too much pressure to one side or another and have uneven seats. And if you’re machining a large number of seats, hand-cutting will become tedious. You also only have specific angles to choose from.
The final machining process we’re going to talk about in this article is seat cutting using multi-angle cutting blades. This is the machining process you’ll probably find in most high production shops because it allows you to cut multiple angles in a single pass. Blades are made from tungsten carbide for excellent cutting and long life and they can be customized. If you need a specific profile it can be made, no problem.
The biggest disadvantage to this system is initial cost. Let me put it this way, it ain’t cheap to get into. BUT once you have the basic tooling, about all you need to replace are the cutting tips. This cutting system is also dependent on a seat and guide machine or knee mill. You cannot use it manually.
I know that I’ve only touched the surface of this topic. There’s so much more to say about the whys and hows of valve seat cutting that it could fill a textbook. In fact, you could look up Engine Service Automotive Machining and Engine Repair by Gary Lewis or Sunnen’s Complete Cylinder Head and Engine Rebuilding Handbook by John G. Edwards.
As always, if you have questions about anything in this post, contact the Goodson Techxperts™ at 1-800-533-8010.